PROJECT MANAGEMENT:
Microsoft Dynamics 365 Business Central offers project managers the ability to manage customer projects quickly, easily, and efficiently. With the power of Dynamics 365, you’ll be able to increase productivity while simultaneously reducing your overall workload.
Using Dynamics 365 for Project Management
As a project manager, you can use Dynamics 365 Business Central to develop and present a solution to your customers that includes billable time, tasks, mobility, resources, planning, and so on.
To see just how effective Dynamics 365 can be for project managers, we’ll look at a five step process centered on creating a new job and invoicing the corresponding customer. The steps include:
Creating a new job
Setting up a time sheet
Approving the time sheet
Creating a job journal
Invoicing the customer
Creating a Job in Dynamics 365
First, we’ll log into Dynamics 365 as a project manager. When logged in as a project manager, you’ll immediately have access to all of the information needed to perform your work effectively.
To get started, we’ll create a new job. There are two ways this can be done: you can use an existing job template to create the new job, or simply start a new project. If you opt to use an existing job, it’s best to select a previous job similar to the one you’re currently setting up.
Under Start, select Create New Job. Then, select yes to create a new job from an existing one. You can then choose which job to use as your template and select which tasks to associate with the job. You have the option of picking individual tasks or a range of tasks. When you’re done, click Finish and the new job will be created.
Setting Up a New Time Sheet
Now, let’s create a sample time sheet for a consultant who’s working on this new job.
Under Time Sheets on the dashboard page, select Open Time Sheets. Open a time sheet, and you’ll notice that there are tasks which individual entries can be assigned to. We’ll assign this time sheet to the Consulting task that’s associated with the current project. Finally, we’ll input the time involved for this task, then submit the time sheet for approval.
Approving a Time Sheet
So, the consultant working on this project has submitted their time for approval. As a project manager, you’ll need to approve it.
On the project manager dashboard under Approvals, there will now be a new time sheet available under Time Sheets...Approve. Click here, open the corresponding time sheet, and then click Approve at the top of the screen to approve the time sheet.
Creating a Job Journal
Back on the dashboard screen, click the plus sign above Job Journal under the Start heading.
Now that the consultant’s time has been submitted and approved, Dynamics 365 can set up your job journal for you automatically. When you click the Suggested Lines option at the top of the screen, the approved time sheet entries associated with various job tasks will be imported into the job journal. Click Post in order to post the journal lines.
Invoicing Your Customer in Dynamics 365
Finally, we can invoice the customer for the job in question.
From the project manager dashboard, select Jobs from the top-left corner of the screen. Next, click Process, and then choose Create Job Sales Invoice from the drop down menu. Click OK to complete the invoice creation.
Now, we’ll post this sales invoice. Select Process again, followed by Sales Invoices/Credit Memos. Next, click Open Sales Invoice/Credit Memos. From here, you can select individual lines or post all of the tasks listed. Either option will result in the creation and posting of an invoice for your customer.
How to create Jobs:
Navigation:
Home>> jobs

Click on new

Specifies the number of entry according to the specified number series.
Write job description.
Select the number of customer who pays for the job.
Specify the person at your company who is responsible for the job.
TASKS:

Select the job task number.
Give description.
Select job task type for main heading select Begin Toatl and for sub headings select posting.
Click on planning lines.

Specify the number of related job task.
Specifies the types of planning lines.
Planning start line.
Planning delivery date.
Specifies the types of account lines to which the planning lines relates.
Specifies the number of accounts to which the resource item are posted.
Give description about G/L account to which the entry is posted.
Select quantity
Specifies the number of units of the resource, item or G/L that should be specified on planning line.
Specify the cost of one unit of item/ resource on line.
Specify the total cost for planning line.
Specify the price one item or resource you can entered it manually or have it entered according to the price/ profit calculation field.
Specify the amount that will be posted to the job ledger.
Posting:
Select job status like open quote or completed etc.
Job posting group. According to the status we select posting group.
Specify the method that is used to calculate WIP for the job.
Posting method.
TIMESHEET:
Navigation:
Home>> Timesheet.

Select timesheet number select timesheet number.
Select resource number.
Select type.
Description.
Click on submit.

Status will be change into submitted.
Approve time sheet:
Click on manage time sheets.


Click on approve button. Status will be changed into approve.
JOB JOURNAL:
Home>>Role center>> click on job journal


From journal lines click on Suggest lines from time sheet

Time sheet lines are showing here.
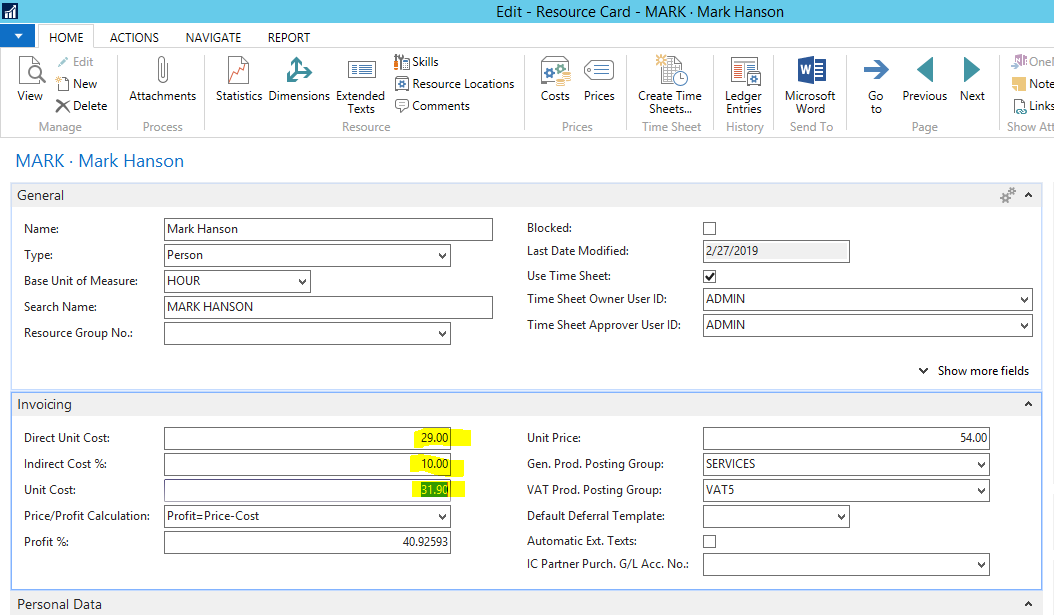
Open the resource check the unit cost here.

If anyone want to receive fixed amount without salary then click on cost and select the fixed amount for that.
Customer Invoice:
We can invoice the customer for the job.
Navigation:
Open the job click on job planning lines >> click on create sales invoices.

Purchase Order:


In Business Central, you can perform common project management tasks, such as configuring a job and scheduling a resource, as well as providing the information needed to manage budgets and monitor progress. Contact us for microsoft business central trial
ReplyDelete